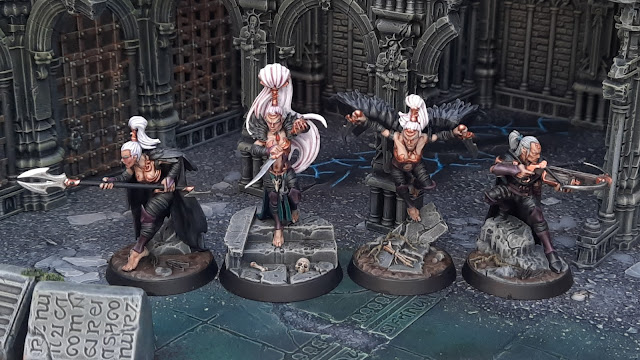
Knives of the Crone - Warband Review
Fighter Characteristics
All fighters in the warband have Move 4, which is standard for Aelves. The team is made up of three fighters with 4 Health and one with 3 Health.
The leader, Vix, has 4 Health, starts on 2 Dodge, and gives up 2 Bounty. Her single melee attack is Range 1, hitting on 2 Hammers for 2 Damage. It’s a functional stat line, but nothing standout. When inspired, she gains an extra dice on her attack, improving it to 3 Hammers. She’s the least critical fighter to inspire, though the accuracy boost can still be helpful when needed.
Tazari also has 4 Health and starts on 1 Dodge, giving up 2 Bounty. She begins with two melee attack profiles: one at Range 1, 2 Hammers for 2 Damage, and another at Range 2, 3 Swords for 1 Damage. When inspired, she improves significantly, gaining 2 Dodge, the Flying runemark, and her attacks merge into a single profile at Range 2, 2 Hammers for 2 Damage. She’s my second priority for inspiration, as the upgrade makes her much more mobile and consistent.
Next is Krieta, with 4 Health, 1 Dodge, and a 2 Bounty value. Her attack is straightforward but punchy: Range 1, hitting on 4 Swords for 1 Damage. On inspiration, she gains 2 Dodge, the Flying runemark, and her damage increases to 2. While her profile seems simple, the high accuracy and potential output when inspired make her, in my view, the most important fighter to flip early.
Lastly, there’s Azphel, the lone 3 Health fighter. He starts on 1 Dodge and only gives up 1 Bounty. His melee attack is Range 1, 2 Swords for 1 Damage, while his ranged option sits at Range 3, 2 Hammers for 1 Damage. Upon inspiration, he jumps to 2 Dodge. His melee improves to 2 Hammers, and his ranged attack improves to 3 Hammers. He’s a classic Aelven archer, flexible but fragile, to be used as a positional piece and I’d rank him third in terms of inspire priority.
 |
| All ratings out of 5 (What do the stats mean?) |
Looking at just the uninspired fighter characteristics, we can compare the Knives of the Crone to other playable Aelven warbands (Ylthari's Guardians, Myari's Purifiers and Cyreni's Razors). In terms of Speed and Damage reliability, they appear to be on par with their peers. However, they sit on the lower end when it comes to Durability and Threat range. Overall, their base fighter stats are consistent with typical Aelven warbands, though they may come off as slightly more fragile. The real question is whether their warscroll can compensate for these shortcomings.
How Do They Inspire?
After a fighter makes a successful attack, if Foretold Wisdom is rolled on the Prophecy table, that fighter inspires.
This is a tough inspire condition. First, the fighter must make a successful attack. Then, you need to roll four dice on the Prophecy table and hit Foretold Wisdom, which requires two Hammers (or Crits). Only then does that fighter inspire. So essentially, you need three things to go your way: the attack has to hit, the defender has to fail their save, and then you have to roll the right result on the Prophecy table. And importantly, only the attacking fighter can be inspired this way. If you want to inspire a second fighter, you’ll need to go through the whole process again, starting with their uninspired (and generally worse) attack profile.
As I said, it’s a tough ask. But do you need to inspire? In short, yes. Inspiring the warband significantly boosts both their durability and their damage output. Without inspiration, they feel below the curve. With it, they become much more competitive.
February 2026 update.
Inspiration now triggers if 'Foretold Wisdom' is rolled at the start of the first Action step of the Battle Round, in addition to after a successful attack.
Rituals of Prophecy
At the start of each round, and, as we’ll see later, when using Visions in the Blood, you make a roll on the Prophecy Table. This uses four attack dice, and you’re looking for pairs of matching symbols. Crits can be used as wilds, counting as any symbol. The mechanic strongly echoes Warcry, adding a layer of pre-round strategy to your decisions.
So, what are the odds of rolling a successful prophecy?
Well, in short, 100%. Thanks to wild Crits and the low threshold for triggering at least one result, you're guaranteed to receive some effect from the table every time you roll. The more meaningful question is: what are the odds of rolling a specific result?
Let’s break that down:
-
Foretold Slaughter requires two Swords. With four dice, you’ll hit this 29.6% of the time, just under a third of rolls.
-
Foretold Wisdom needs two Hammers. This comes up 37.5% of the time, slightly over a third.
-
Foretold Protection calls for either two Flanked or two Surrounded symbols, again, 37.5%.
The odds of rolling two different prophecy results at once (i.e. two pairs of symbols) is about 19.5%. And finally, rolling four matching symbols (with Crits helping) happens only 4.15% of the time.
So now that we’ve math-hammered it out, here’s the takeaway: you’ll always get a prophecy bonus, and it often feels comparable in power to an extra ploy. The downside? You don’t get to pick which one you get, and you have to use it when it’s triggered. In the early game, Foretold Wisdom is especially important as it enables inspiration. Later in the game, Foretold Slaughter or Protection can offer more impactful utility.
That said, I’ve been talking about these like everyone already knows what they do, so let’s fix that:
Foretold Wisdom
If rolled after a successful attack (such as through Visions in the Blood), the attacking fighter inspires, giving them a permanent, significant boost. In addition, this prophecy lets you look at the top card of your Objective deck and either keep it there or place it on the bottom. This is a deceptively powerful effect. It helps smooth out your hand and lets you plan ahead, or tuck away late-game cards like Annihilate so they don’t clog your early draws.
Foretold Slaughter
This gives the next melee attack Critical Grievous, boosting its damage potential. While the warband’s base damage is on par with other Aelves, this ability opens the door to hitting above their weight class. It’s particularly nasty with Krieta’s 4 Hammer attack, suddenly that low base damage can spike into something much more lethal.
February 2026 update
'Foretold Slaughter' now gives access to Cleave and Ensnare on your next melee attack instead of Crit Grievous. These weapon abilities will help to increase the chance of a successful attack, which will then trigger Rituals of Prophecy.
Though the prophecy effects must be used right away, you can tactically delay Slaughter by first attacking with a ranged weapon, such as Azphel’s shot, to save the ability for later use.
Foretold Protection
This grants a reroll on the next defense roll you make that round. It’s especially helpful early on, when your fighters are stuck at 1 Dodge. But once inspired, everyone moves to 2 Dodge, and this effect becomes significantly more potent. Combine it with Cover or Guard and you can make these “fragile” Aelves surprisingly resilient.
This prophecy system is one of the most interesting parts of the warband. It adds tactical depth, but it also introduces a layer of inconsistency. Your ability to capitalize on these effects, and time them well, will likely define whether the Knives of the Crone feel smooth and sharp or just a little too brittle.
Visions in the Blood
Visions in the Blood is a Surge ability that triggers after a friendly fighter makes a successful attack. It is worth noting that it does not require a kill, just a hit. When triggered, it allows you to roll again on the Prophecy table.
This ability is absolutely essential for helping the warband reach its potential. In the early game, it increases your chances of hitting Foretold Wisdom, which is key for inspiring your fighters. As the match goes on, it continues to offer strong utility, giving you access to effects like Foretold Slaughter for extra damage or Foretold Protection for more reliable saves.
Visions in the Blood is what keeps the prophecy mechanic feeling interactive and responsive. It helps overcome the steep inspire condition and can turn a single successful attack into a turning point in the round. Timing it well is crucial, but the reward is often worth the setup.
Final Thoughts and Warband Pairings
Playstyle: Mastery and Strike
This is a Mastery warband at heart. It has more complexity than many others and rewards careful play and planning. It also leans into the Strike style, since making successful attacks is essential for accessing the Prophecy table and the Inspire mechanic. That said, do not make the mistake of thinking you can simply rush into your opponent's territory and start taking fighters off the board. You will need to be more cunning than that.
 |
| My Knives of the Crone |
How I Paint - Daughters of Khaine - Knives of the Crone
In truth, this warband plays best with a flexible strategy. You want to lean into a Flex to Strike approach, able to respond to the flow of the game, waiting for the right moments to press your advantage.
My first thought for a pairing is Blazing Assault, which brings access to Grievous, additional dice, and push tech. This can help you land those key attacks and boost your tempo when the opportunity arises. I would also consider adding cards from Pillage and Plunder, which offer strong early game scoring through passive interaction with Feature tokens. Let your opponent come to you. Then, once your fighters have picked up upgrades and become inspired, you can start eliminating targets. There is no need to rush. Like the crow these fighters venerate, wait until you spot an isolated foe and then strike.
When I first looked at this warband, I was not impressed. But having taken the time to go through their fighter cards and their warscroll, I think there is something here. The warband has a high skill ceiling and may not play out consistently from game to game, but it comes with built-in objective control, attack boosts, and durability improvements. There is a gem buried in this warband—it will just take some work to dig it out.
What do you think to this warband? Do you use them? If so what decks do you pair with them?
Checkout my Warhammer Underworlds for more articles.


Comments
Post a Comment